A hole in your wall is one of the most common and most anxiety-inducing home repair problems — partly because it looks bad, and partly because most people have no idea how to fix it. The good news is that drywall repair is one of the most beginner-friendly home repairs you can do. With the right materials and a little patience, you can make any hole disappear completely. Here is the complete guide, from a nail hole to a large damaged section.
Materials You Will Need
Before starting any drywall repair, gather your materials. Running to the hardware store mid-repair when your hands are covered in compound is a miserable experience. Here is what you need based on hole size:
For Small Holes (under 1 inch)
- Lightweight spackling compound (DAP Alex Plus or similar) — not joint compound for holes this small
- Putty knife — a 3-inch flexible blade is ideal
- Fine grit sandpaper (120 grit)
- Paint and primer
For Medium Holes (1 to 4 inches)
- Self-adhesive mesh drywall patch — available at any hardware store for $5–$10
- All-purpose joint compound (pre-mixed)
- 4-inch and 6-inch putty knives
- 120 grit and 220 grit sandpaper
- Sanding block
- Paint, primer, and roller
For Large Holes (4 inches and bigger)
- Drywall panel — a small sheet or scrap piece at least as large as your hole
- Drywall saw or utility knife
- 2×4 lumber or drywall backer clips
- Drywall screws (1-5/8 inch)
- Drywall tape (paper or mesh)
- All-purpose joint compound
- 6-inch and 10-inch taping knives
- Sandpaper in 80, 120, and 220 grit
- Primer and paint
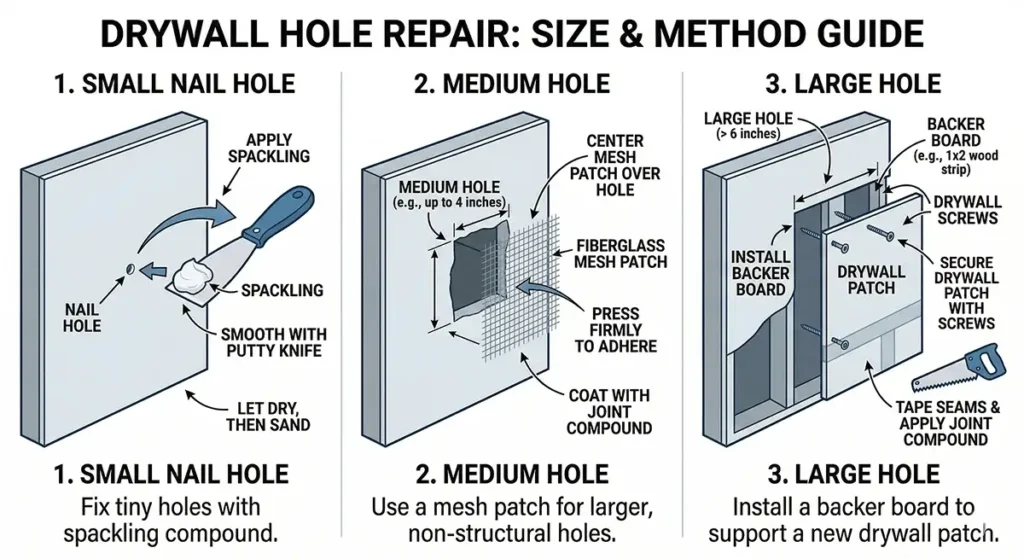
Fixing Small Holes — Nail and Screw Holes Under 1 Inch
Nail holes, small screw holes, and picture hanger holes are the easiest repair in home maintenance. This entire process takes about 15 minutes of active time plus drying.
- Clean the hole. If there are any torn paper fibers around the edge of the hole, press them flat against the wall or trim them with a utility knife. Loose fibers will telegraph through your finish coat.
- Apply spackling with your finger or putty knife. Press a small amount of spackling compound into the hole, forcing it in to fill the cavity. Smooth it flush with the wall surface. For holes under a quarter inch, your finger is actually the best tool — it applies exactly the right pressure and wipes flush naturally.
- Slightly overfill. Spackling shrinks slightly as it dries. Apply a tiny amount above the wall surface — maybe 1/16 of an inch — so after shrinkage it lands flush.
- Let it dry completely. Most lightweight spackling is dry in 1–2 hours. The compound changes color from pink or tan to bright white when fully dry. Do not sand it before it is completely white.
- Sand smooth. Use 120 grit sandpaper on a block, lightly sand in circular motions until the patched area is completely flush with the surrounding wall. Run your fingers over it — if you feel any ridge or bump, sand more. If you feel a depression, apply a second thin coat and repeat.
- Prime and paint. Even small patches need primer before painting or the paint will absorb differently and the spot will show through as a sheen difference even if the color matches.
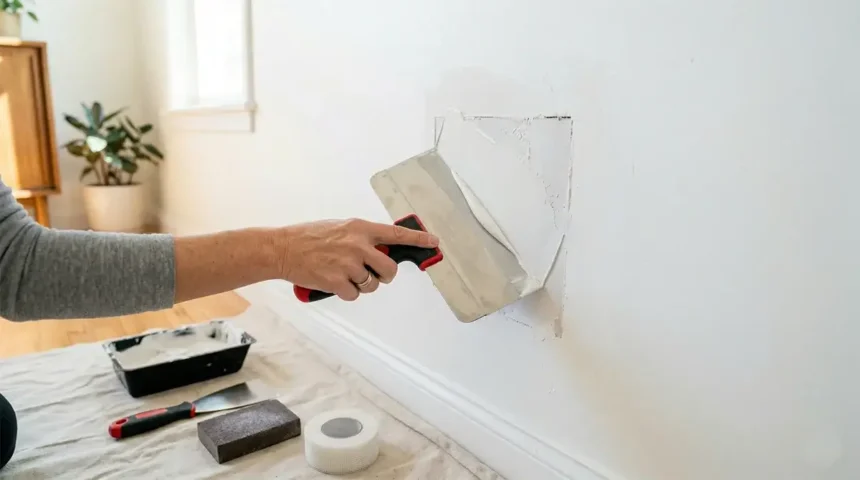
Fixing Medium Holes — 1 to 4 Inches
Doorknob holes, corner damage, and accidental impacts typically fall in this range. A self-adhesive mesh patch makes this repair straightforward.
- Clean and prepare the hole edges. Remove any loose drywall chunks. If the paper facing is torn around the hole, press it flat or score and remove it. The edges need to be as clean and stable as possible.
- Apply the mesh patch. Peel and stick the self-adhesive mesh patch directly over the hole, centered so the mesh extends at least an inch beyond the hole in every direction. Press firmly around all edges.
- Apply the first coat of joint compound. Using a 6-inch putty knife, apply all-purpose joint compound over the mesh, pressing it through the mesh openings and feathering the edges outward several inches beyond the patch. The goal of the first coat is to embed the mesh and fill the hole — it does not need to look perfect. Let dry completely (minimum 24 hours for joint compound).
- Apply the second coat. Sand the first coat lightly with 120 grit to knock down any ridges. Apply a wider second coat with an 8-inch knife, feathering even further beyond the first coat. This coat should be thinner than the first — you are building toward a smooth surface, not filling.
- Apply the third coat if needed. Most medium patches require three thin coats for a seamless result. The third coat should be very thin — almost translucent — applied with a wide knife and feathered 8–10 inches from center. Sand with 220 grit when dry.
- Check with a light. Hold a work light or lamp at a raking angle close to the wall surface. This side lighting reveals any ridges, texture differences, or low spots that will be invisible to direct overhead lighting but will show after painting. Address any imperfections before painting.
“The difference between a professional drywall patch and an amateur one is almost never the first coat — it is the feathering on the second and third coats. The farther you feather out from the patch, the less noticeable the transition.”
Fixing Large Holes — 4 Inches and Bigger
Large holes require backing support before you can patch. Without something for the new drywall to attach to, your patch will flex and crack. There are two methods:
Method 1 — California Patch (best for rectangular holes)
- Cut the damaged area into a clean rectangle using a drywall saw or utility knife. Use a T-square for straight lines.
- Cut a piece of new drywall approximately 4 inches wider and taller than your rectangular cutout.
- On the back of this new piece, score and snap off a 2-inch strip from all four edges — leaving the paper face intact as a flap. You now have a piece that is the exact size of your hole with a 2-inch paper border extending from all sides.
- Apply joint compound around the hole edges, then press the patch into place so the paper border overlaps the existing wall surface. Smooth firmly.
- Apply joint compound over the paper borders and proceed with multiple thin coats as described for medium holes.
Method 2 — Backer Board Method (most secure, for any shape)
- Cut the damaged area into a clean rectangle.
- Cut two pieces of 2×4 lumber longer than the height of your hole. Insert them into the hole at each side and screw them to the existing drywall from the front using drywall screws — these become your backing nailers.
- Cut new drywall to fit the rectangular opening exactly. Screw it to the backing nailers.
- Apply drywall tape over all seams, embed with joint compound, and apply multiple coats as described above.
Applying and Sanding Joint Compound — The Key Skills
Joint compound application is the skill that separates invisible patches from visible ones. Key principles:
- Thin coats dry better and shrink less than thick coats. Multiple thin coats always produce better results than one thick coat.
- Each coat should be wider than the last. The final coat on a 4-inch hole should be feathered out 10–12 inches from the center on all sides.
- Always sand between coats. You are not trying to remove material — just knock down ridges and high spots left by knife marks.
- Wipe dust before each new coat. Drywall dust mixed into fresh compound creates texture problems.
- The final sanding should be with 220 grit and light pressure. You want a smooth surface, not a sanded-through surface.
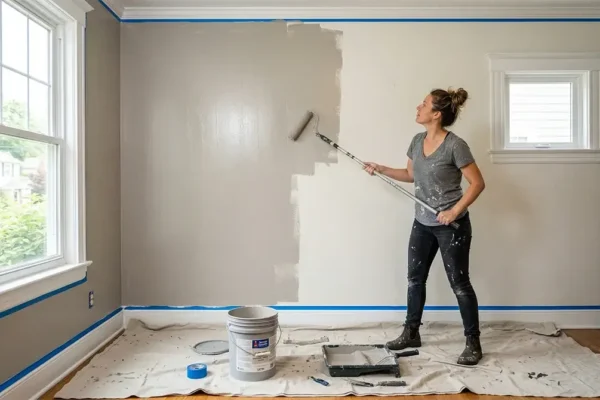
Painting to Match — The Step Most People Get Wrong
This is where 80% of DIY drywall repairs fail — not in the patching, but in the painting. Specifically: people skip primer, use the wrong sheen, or apply paint in a way that reveals the patch.
- Always prime before painting. Joint compound is extremely porous and absorbs paint differently than the surrounding wall. Without primer, the patched area will look flat and dull against the surrounding painted surface — a phenomenon called “flashing.” Use a drywall primer or PVA primer on the patched area before applying finish paint.
- Match the sheen level exactly. A flat wall painted with eggshell on the patch will show even if the color matches perfectly. Get the exact sheen level of your existing paint — bring a paint chip to your paint store if uncertain.
- Roll the entire wall when possible. On a large patch or in a room where the walls have aged, rolling the entire wall with the same paint eliminates the possibility of the patch showing. It takes 30 more minutes and completely solves the visible-patch problem.
- If only touching up: Apply paint in a W or M pattern rather than a straight line to blend the edges into the surrounding surface.
Common Mistakes and How to Avoid Them
- Applying too-thick coats: Joint compound shrinks. Thick coats crack. Three thin coats beat one thick coat every time.
- Not feathering far enough: The patch should be invisible when you stand back. If you can see where the compound ends, you did not feather far enough.
- Sanding too aggressively: Sanding through the paper facing of existing drywall creates a fuzzy surface that will show through paint. Light, patient sanding.
- Skipping the raking light check: Never paint without holding a light at an angle to the wall first. This reveals every imperfection that will otherwise show after painting.
- Painting without priming: Already covered above — this is the single most common reason a patch is still visible after painting.
For guidance on matching wall textures — popcorn, orange peel, and knockdown finishes — This Old House provides detailed texture-matching techniques that go beyond smooth wall repair.
With patience and the right materials, a drywall repair you do yourself is genuinely invisible — indistinguishable from the surrounding wall. The key is not rushing the drying time and not skipping the primer. Everything else is just practice.
Leave a Reply