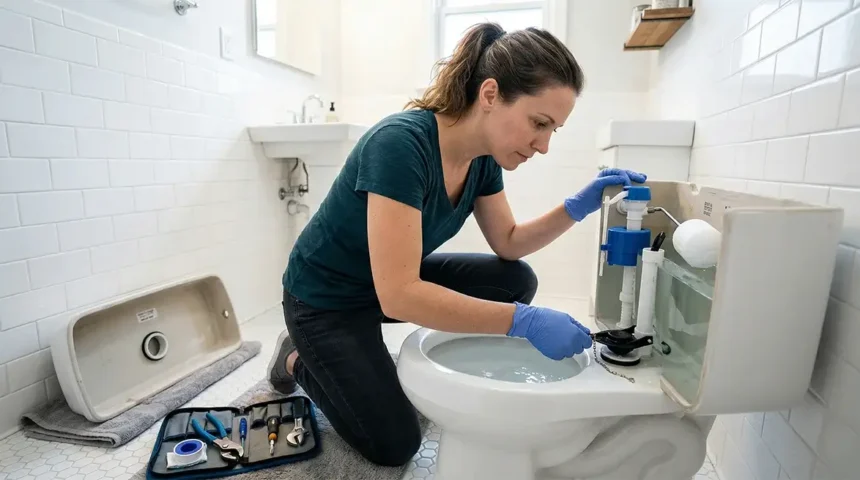
A toilet that keeps running after you flush — that hissing, trickling sound that refuses to stop — is wasting more water and money than most homeowners realize. According to the EPA, a constantly running toilet can waste up to 200 gallons of water per day. At average American water rates in 2026, that running toilet is costing you $50–$100 per month in wasted water.
The good news: a running toilet is one of the most DIY-friendly repairs in your home. The parts are inexpensive ($10–$30), the tools required are minimal (usually none), and the repair in most cases takes under 30 minutes. Here is the complete diagnostic and repair guide.
Diagnosing Why Your Toilet Is Running
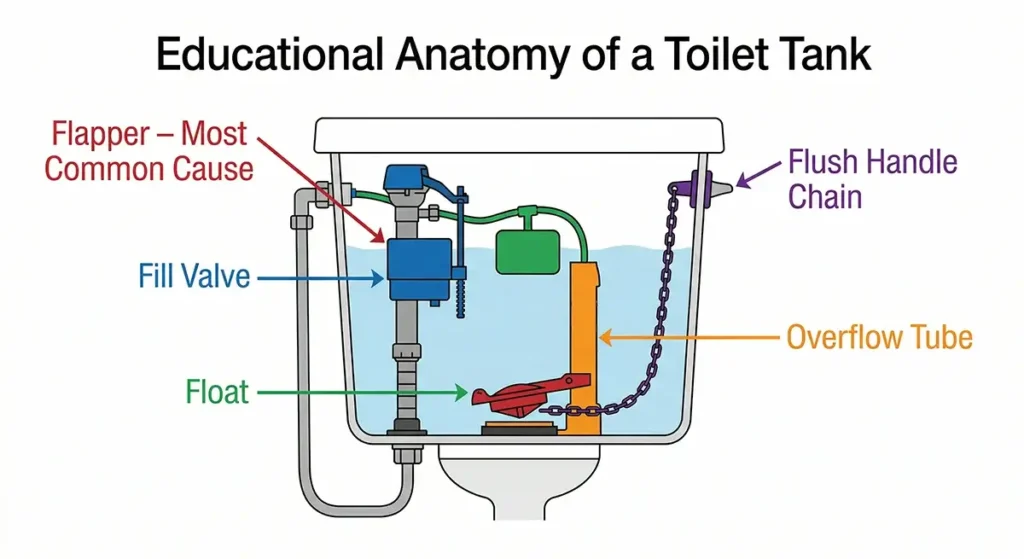
Before buying parts, identify the cause. Remove the toilet tank lid and observe what is happening. A toilet runs continuously for one of four reasons:
The Dye Test
Drop a few drops of food coloring into the tank (not the bowl). Wait 10 minutes without flushing. If color appears in the bowl, water is leaking from the tank through the flapper or flush valve. This is the most common cause of a running toilet and tells you the flapper needs replacement.
What to Look For
- Water running into the bowl continuously: Flapper is not sealing. Replace the flapper.
- Water trickling out of the overflow tube: Water level in the tank is too high. Adjust the float down.
- Fill valve running intermittently (short bursts every few minutes): Slow flapper leak. Replace the flapper.
- Fill valve runs and runs but tank never fills: Fill valve is faulty. Replace the fill valve.
- Handle sticks in the down position after flushing: Flush handle chain is too short or tangled, holding flapper open. Adjust chain length.
Fixing a Faulty Flapper — The Most Common Cause
The flapper is the rubber seal at the bottom of the tank that lifts when you flush (releasing water into the bowl) and drops back down to seal the tank for refilling. Over time, the rubber deteriorates, warps, or accumulates mineral deposits that prevent a proper seal. Replacement is almost always the solution.
Step-by-Step Flapper Replacement
- Turn off the water supply. The supply valve is on the wall behind or below the toilet. Turn it clockwise until it stops. Flush the toilet to empty the tank.
- Identify your flapper type. Remove the old flapper by unhooking the ears from the pegs on the overflow tube and disconnecting the chain from the flush handle arm. Take the old flapper to the hardware store or photograph the model number printed on it to buy an exact replacement. Universal flappers (Fluidmaster 502 series) fit most American toilets.
- Install the new flapper. Hook the new flapper’s ears onto the overflow tube pegs. Attach the chain to the flush handle arm with approximately 1/2 inch of slack — enough that the flapper closes completely, but not so much slack that the chain gets trapped under the flapper.
- Turn the water supply back on and let the tank fill. Flush once and observe the flapper dropping and sealing. Check that the fill valve stops running within 30–60 seconds of flushing.
- Do the dye test again after 10 minutes to confirm the leak is resolved.
Chain Length Is Critical
The most common installation mistake with a new flapper is incorrect chain length. Too little slack and the chain holds the flapper slightly open, causing a constant slow leak. Too much slack and the chain gets trapped under the flapper, causing an incomplete seal. The correct chain length allows the flapper to seat fully while still lifting completely when the handle is pressed.
Replacing the Fill Valve
The fill valve (also called a ballcock) controls water refilling the tank after a flush. Signs that the fill valve needs replacement: it runs for more than 2 minutes after flushing, it makes a hissing or vibrating sound while running, or it runs but the tank never reaches the full line.
Fill Valve Replacement
- Turn off the supply valve and flush to empty the tank.
- Use a sponge to remove the remaining water from the tank bottom.
- Disconnect the supply line from the bottom of the fill valve (have a towel ready for residual water).
- Inside the tank, unscrew the locknut on the fill valve shank (counterclockwise) — this is almost always hand-tight only.
- Lift out the old fill valve.
- The Fluidmaster 400A is the industry standard replacement fill valve and fits virtually all American toilets. Insert it into the tank hole, adjust the height according to the instructions (the top of the valve should be 1 inch above the overflow tube), and hand-tighten the locknut.
- Reconnect the supply line, turn on the water, and adjust the water level using the adjustment clip on the fill valve. The water level should be approximately 1 inch below the top of the overflow tube.
Adjusting the Float
If water is running out of the overflow tube (the tall plastic tube in the center of the tank), the water level is set too high. The float — which rises with the water level to shut off the fill valve — needs to be adjusted downward.
There are two types of float systems in modern toilets:
- Ball float (older style): A round ball on a metal arm. Bend the arm slightly downward to lower the shut-off point. The water level should be about 1 inch below the overflow tube.
- Cup float (modern style, most common): A plastic cup that slides along the fill valve body. Adjust by pinching the adjustment clip and sliding it downward, or by turning the adjustment screw clockwise to lower the water level.
The EPA’s Fix a Leak Week program estimates that household leaks — with running toilets being the most common — waste nearly 1 trillion gallons of water annually across the United States. A properly functioning toilet is both a financial and environmental benefit.
Replacing the Flush Valve Seat
If you have replaced the flapper and the toilet still leaks past the flapper, the issue may be the flush valve seat — the surface the flapper seals against. If this surface is pitted, corroded, or damaged by mineral deposits, even a new flapper cannot seal against it.
Option 1 — Clean the Seat
Turn off the water and empty the tank. Inspect the seat surface with your finger for sharp deposits or rough texture. Use fine steel wool or a seat-resurfacing tool (available at hardware stores for $8) to smooth the seat surface. This resolves most seat-related sealing problems.
Option 2 — Replace the Entire Flush Valve
If the seat is significantly damaged, the entire flush valve (the drain assembly at the bottom of the tank) can be replaced. This is a more involved repair requiring the toilet tank to be removed from the bowl — about 30 minutes of additional work — but the parts cost under $20 and the repair is permanent.
Fixing a Sticking Handle
If your toilet runs because the handle sticks in the down position after flushing, holding the flapper open:
- First check the chain — it may be looped around the handle arm. Straighten it.
- If the handle itself is sticking, remove the decorative cap and unscrew the handle nut (left-hand thread — clockwise to loosen). Inspect the mounting arm for corrosion or debris. Clean and lubricate with plumber’s grease, or replace the handle assembly ($8–$15).
Parts Cost and Where to Buy
| Part | Cost | Best Option |
|---|---|---|
| Replacement flapper | $5–$10 | Fluidmaster 501B Universal |
| Fill valve | $12–$18 | Fluidmaster 400A |
| Complete repair kit (both) | $18–$25 | Fluidmaster 400AKRP10 |
| Flush handle | $8–$15 | Any hardware store universal |
All parts are available at Home Depot, Lowe’s, Ace Hardware, and Amazon. The Fluidmaster brand is the industry standard and fits the vast majority of American residential toilets. If in doubt, bring the old part or the toilet model number to the store — staff can confirm compatibility.
For advanced toilet repair situations including wax ring replacement and toilet removal, This Old House provides detailed guidance on complete toilet overhauls when simple part replacement is not sufficient.

Leave a Reply